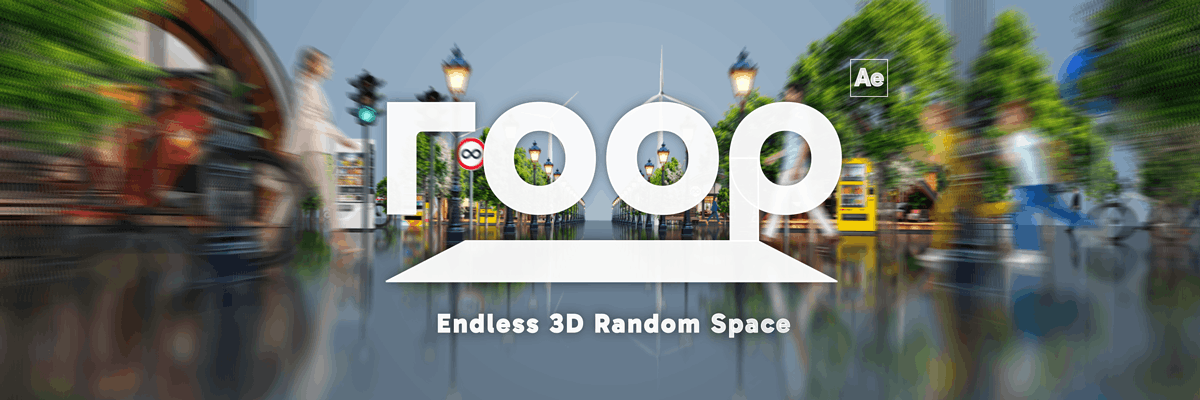
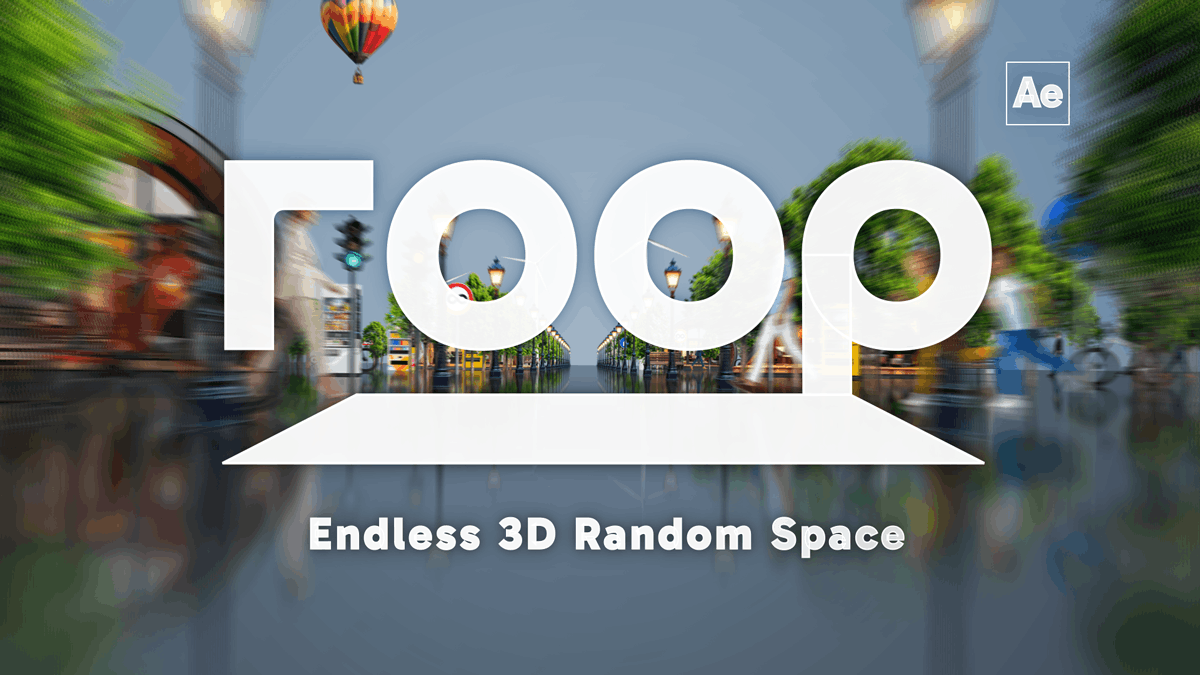
roop is an AE script that automatically constructs endless 3D random spaces with a single click.
In addition to its seamless looping capabilities, it features over 40 powerful tools, including camera viewpoint movement functions to streamline your 3D editing.
With more than 20 animation parameters and nearly 40 global script settings, you can flexibly customize every behavior to achieve highly efficient 3D workflows.
Setup
Using Aescripts + AEPlugins Manager
Using Aescripts + AEPlugins Manager makes installation and license management easy.
To install a trial, select ‘Add Trial’ from the ‘Account’ menu.
aescripts + aeplugins manager : https://aescripts.com/learn/aescripts-aeplugins-manager-app/
If Not Using Aescripts + AEPlugins Manager
- Extract the downloaded file,
roop_v[version number].zip. - Open the extracted folder,
roop_v[version number]. - Move the following two files (jsxbin, txt) to the ScriptUI folder.
- roop.jsxbin
- roop_README.txt
Windows:Program Files\Adobe\Adobe After Effects <version>\Support Files\Scripts\ScriptUI Panels
macOS:Applications/Adobe After Effects <version>/Scripts/ScriptUI Panels
Launch
- Select “roop.jsxbin” from the “Window” menu to launch.
- If a script alert appears, follow the instructions and change the following settings.
To enable roop, go to Preferences – Scripts & Expressions and check the box for “Allow Scripts to Write Files and Access Network.”
- If the license key input screen appears, enter the license key and press OK.
- If you are using the trial version, leave it as “trial” and press OK.
- If “roop.jsxbin” does not appear in the Window menu, check if roop.jsxbin is inside the ScriptUI Panels folder.
Quick Start: Let’s Generate a 3D Space!
In this section, we will generate a 3D space using a placeholder layer.
- Create a composition.
- Click the [Create Placeholder Layer (16:9)] button, located second from the left in the “Layer” functional group.
- Select the layer created in step 2 and click the [Apply Space Loop] button on the far left of the “Loop” functional group.
- Select the layer named “Space_…” and duplicate it about 10 times.
- Play the timeline.
That’s it! Camera animation is applied automatically, so you can see the infinite 3D space in motion just by playing the preview.
While we used a placeholder layer for this quick start, roop supports various layer types, including images, text layers, shape layers, and pre-compositions.
When using placeholders, you can easily swap them for images later by replacing the placeholder inside the pre-composition.
Main Features
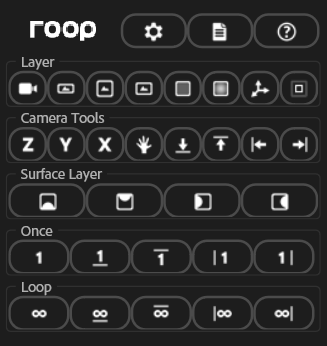

roop is designed so that all functions can be executed with a single click.
The layout also automatically adjusts to the window size.
The functions are explained in the order they appear from the top of the startup screen.
Options (Header)
Opens various option windows.
Displays the settings window. You can change various script-related settings.
Displays the log of execution results. If an operation fails, the reason will be displayed here.
Displays the help window.
Layer
Creates various layers.
Creates a camera layer.
Creates a placeholder layer (Aspect Ratio: 16:9).
Creates a placeholder layer (Aspect Ratio: 1:1).
Creates a placeholder layer (Aspect Ratio: 4:3).
Creates a background layer for the 3D space.
Creates an overlay layer to add a vignette effect.
Creates a guide layer that indicates the camera’s rotation status.
Creates a guide layer showing the initial range for loop display.
- Direction Guide Layer / Base Range Guide Layer / Display Guide Layer are typically not included in the final rendering. You can include them in your render by disabling their “Guide Layer” status.
Camera Tools
Adds animations to the camera or moves the viewpoint.
Adds keyframes to move the camera in the Z+ direction.
Adds keyframes to move the camera in the Y+ direction.
Adds keyframes to move the camera in the X+ direction.
Adds camera shake by applying wiggle to the orientation property.
Moves the camera position to the floor viewpoint (Y position).
Moves the camera position to the ceiling viewpoint (Y position).
Moves the camera position to the left wall viewpoint (X position).
Moves the camera position to the right wall viewpoint (X position).
- The ‘Go to … View’ functions update the values of both the Position and Point of Interest (POI) to the specified viewpoint (e.g., for Floor View, only the Y-value is modified). If no keyframes are selected, all existing values are updated.
- If Position keyframes are selected, the functions modify only the values of those specific keyframes. In this case, the Point of Interest (POI) is not modified to protect your framing.
Surface Layer
Creates surface layers such as floors. By default, these are also automatically created when using Once or Loop functions.
Creates a floor layer (Virtual 3D).
Creates a ceiling layer (Virtual 3D).
Creates a left wall layer (Virtual 3D).
Creates a right wall layer (Virtual 3D).
Once
Applies the “Once” function, which displays the layer only once. When applied, the same fade behavior as the loop function is added, and various roop features become available for the layer. Use this for layers you want to display only once, such as a final destination point.
Applies the Space Once function to the selected layer.
Applies the Floor Once function to the selected layer.
Applies the Ceiling Once function to the selected layer.
Applies the Left Wall Once function to the selected layer.
Applies the Right Wall Once function to the selected layer.
Loop
Applies the “Loop” function, which displays the layer infinitely. When applied, the layer will loop within the range of the Display Guide Layer (the “DisplayRange” parameter of the Control layer). To disable the random function regardless of the Control layer settings, you can long-press to “Force Random Off.”
Applies the Space Loop function to the selected layer.
Applies the Floor Loop function to the selected layer.
Applies the Ceiling Loop function to the selected layer.
Applies the Left Wall Loop function to the selected layer.
選択レイヤーに右壁ループ機能を適用します。
- Selecting a layer and executing the Once or Loop function will pre-compose it. For Floor, Ceiling, Left Wall, or Right Wall types, a reflection effect is added within the pre-composition, and the center of that pre-composition serves as the surface position.
- The alignment point of the layer is the bottom edge for Floor, top edge for Ceiling, left edge for Left Wall, and right edge for Right Wall. Therefore, when using cropped images, removing any margins on the contact edge in advance will eliminate the need for further adjustments.
- If Once or Loop functions are executed when no camera layer exists, both the camera position and Point of Interest (POI) are automatically aligned to the surface (e.g., floor). Once created, you can freely adjust the camera position using the “Go to … View” functions.
- The Once / Loop functions can be applied to Shape, Text, Solid, Pre-composition, and Footage (Still images/Video) layers.
- Pre-compositions generated by applying the Once / Loop functions can be freely reused within your project. When reused, roop is designed to avoid redundant pre-composition, ensuring that project resources remain optimized.
Behavior Settings
When you apply Once or Loop functions, a control layer named “Control_Roop” is automatically created.
You can change the behavior settings of roop by adjusting the expression control effect values on this Control layer. In addition to the global settings on the Control layer, individual adjustments such as position can be made on the Applied Once/Loop layers (the layers after functions are applied).
Control Layer
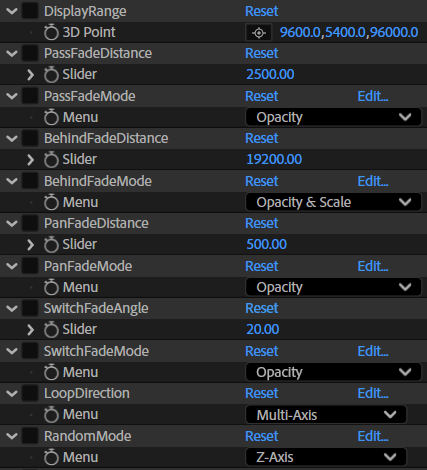
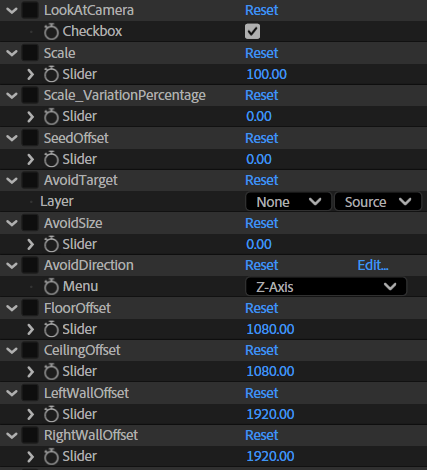
Specifies the world coordinate range for displaying layers, centered on the camera. For example, if set to [4000, 2000, 30000], layers will be displayed within a range of 4000 on the X-axis, 2000 on the Y-axis, and 30000 on the Z-axis. When a layer moves outside this range, it will wrap around and reappear from the opposite side.
Specifies the distance for the pass fade. As a layer passes the camera, the fade process occurs over this distance.
Specifies the pass fade mode. (Opacity & Scale / Opacity / Scale)
Specifies the distance for the behind fade. As a layer appears from behind the camera, the fade process occurs over this distance.
Specifies the behind fade mode. (Opacity & Scale / Opacity / Scale)
Specifies the distance for the pan fade. This fade occurs as the camera moves and layers cross the boundaries of the display range.
Specifies the pan fade mode. (Opacity & Scale / Opacity / Scale)
Specifies the fade angle when the display range switches. This fade occurs when the display range changes due to a significant shift in camera orientation.
Specifies the switch fade mode. (Opacity & Scale / Opacity / Scale)
Specifies the axis for looping. When the camera moves along the specified axis, layers will loop. Selecting “Multi-axis” enables looping in all available directions (e.g., for a Floor Loop, it loops in all directions except the Y-axis). Selecting a single axis like “X-axis” limits looping to that specific direction.
Specifies the randomization axis. Each time a layer reappears as the camera moves along the specified axis, its position on the other axes (e.g., X and Y positions if “Z-axis” is set) changes randomly within the DisplayRange. Selecting “Off” disables randomization.
Sets whether layers automatically face the camera at all times. (ON / OFF)
Sets the scale for Loop/Once layers. Changing this value collectively updates the scale of all Loop/Once layers. The default of 100% represents the original size.
Sets the range for random scale variation. For example, at 10%, the scale varies randomly between 90% and 110%.
Changes the seed value. Adjusting this value changes the random patterns for position, scale, etc.
Creates a tunnel-like space around the specified layer. Only layers with Once or Loop functions applied are affected.
Specifies the diameter of the cleared space. Larger values push surrounding layers further away.
Specifies the direction of the cleared space. For example, selecting the Z-axis creates a tunnel along that axis.
Specifies the offset for the floor position. The floor is created at the specified offset distance below the bottom of the DisplayRange, allowing you to adjust the distance from Space Loop/Once layers.
Specifies the offset for the ceiling position. The ceiling is created at the specified offset distance above the top of the DisplayRange, allowing you to adjust the distance from Space Loop/Once layers.
Specifies the offset for the left wall position. The wall is created at the specified offset distance to the left of the DisplayRange edge, allowing you to adjust the distance from Space Loop/Once layers.
Specifies the offset for the right wall position. The wall is created at the specified offset distance to the right of the DisplayRange edge, allowing you to adjust the distance from Space Loop/Once layers.
Applied Once/Loop layers
Unique additional seed value for the local layer. Use this to change the random pattern for each individual layer.
Adjusts the random position by adding an offset value.
Sets the position when RandomMode is set to OFF.
Sets the layer’s position.
Sets the individual scale for the layer. Use this to adjust size independently of the global Control layer settings.
Sets the individual opacity for the layer. Use this to adjust opacity independently of the various fade behaviors.
Toggles whether the layer is affected by the Avoid function (which creates a tunnel-like clear space). Set this to OFF for layers that you do not want to be moved.
Toggles the fade behavior when passing the camera. If you want to disable opacity changes near the camera—for example, when moving the camera starting from a position where layers are already nearby—set this to OFF.
Reflection Settings
When you execute Once or Loop functions for Floor, Ceiling, Left Wall, or Right Wall, reflection effects are automatically added within the pre-composition.
You can customize the reflection effects (using standard effects) with the following parameters:
Sets the blur amount for the reflected area.
Sets the opacity (0–100) for the reflected area.
Sets the brightness (-100–0) for the reflected area.
Sets the amount of image shift in the X direction.
Sets the amount of image shift in the Y direction.
Other Layer Settings
For the following layers, you can easily change colors and other properties by adjusting the values of the Expression Control effects applied to them.
Background Layer
Changes the background color.
Direction Guide Layer
Changes the scale.
Changes the stroke width.
Changes the line color of the X-vector.
Changes the line color of the Y-vector.
Changes the line color of the Z-vector.
Base Range Guide Layer
Changes the line color.
Display Guide Layer
Changes the line color.
Surface Layer
Changes the surface color.
Script Settings
The following settings can be customized from the settings screen.
General Tab
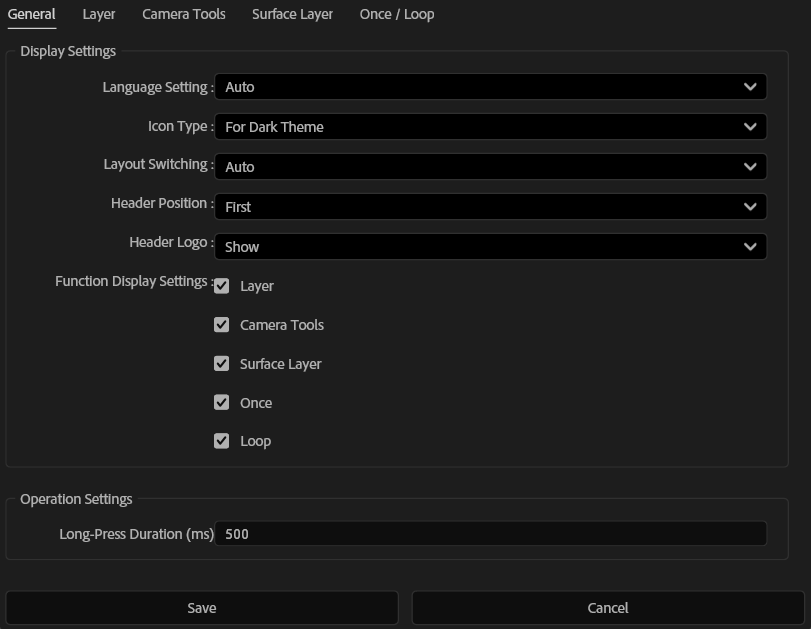
Display Settings
Switches the language for displayed text and created items.
Switches the icon style. White icons are used for the Dark Theme, and black icons are used for the Light Theme.
Switches the layout between Automatic and Fixed. When set to Automatic, the layout switches automatically according to the window size.
Switches the header display position between Start and End.
Switches whether to display the logo in the header.
Toggles the visibility of each feature group.
Operation Settings
Sets the press-and-hold duration for buttons with hold functionality. The duration can be set within a range of 100ms to 1000ms.
Layer Tab
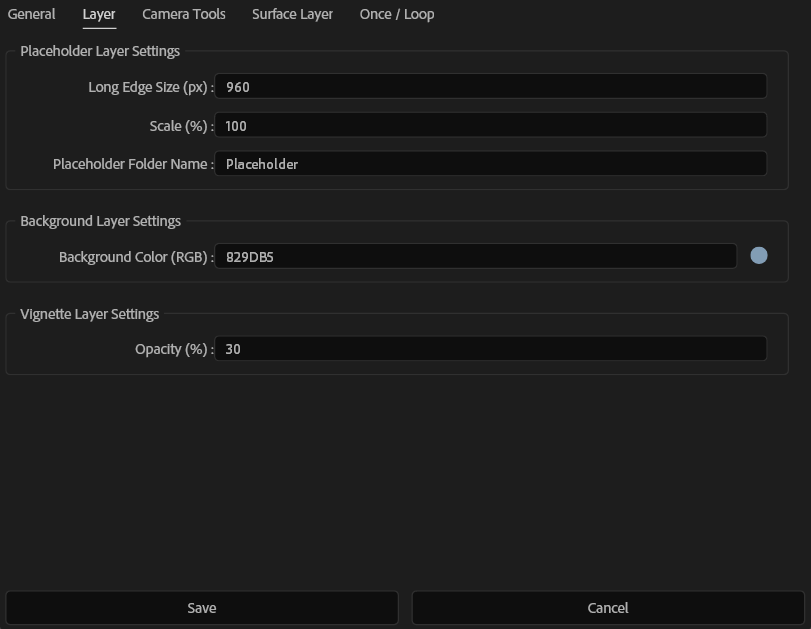
Placeholder Layer Settings
Sets the long edge size (px) of the placeholder layer. The short edge size is automatically calculated based on this value.
Sets the scale of the placeholder layer. Use this setting when you want to minimize the size change when importing an asset with a higher resolution than the placeholder. For example, setting the scale to 50% allows the asset to be displayed at half the size specified by the Long Edge Size.
Sets the name of the folder in the Project Panel where the placeholders will be stored. This folder is created at the same hierarchical level as the active composition.
Background Layer Settings
Sets the color of the background layer in RGB.
Vignette Layer Settings
Sets the opacity of the vignette layer. This layer provides a light source and vignette effect to the underlying layers.
Camera Tools Tab
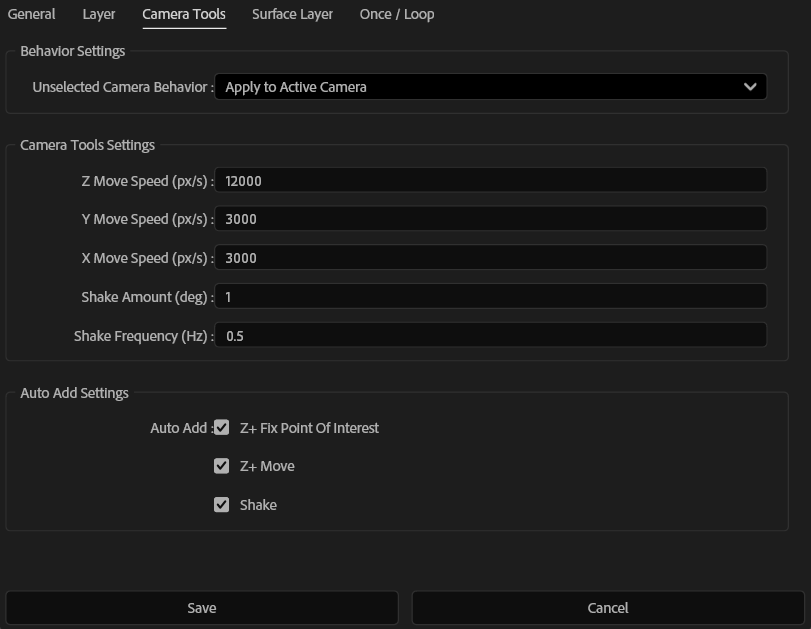
Behavior Settings
Apply to active camera when no camera layer is selected.
Camera Tools Settings
Sets the speed (px/s) for the camera’s move animation along the Z axis. This value is used for both Z+ and Z- movements.
Sets the speed (px/s) for the camera’s move animation along the Y axis. This value is used for both Y+ and Y- movements.
Sets the speed (px/s) for the camera’s move animation along the X axis. This value is used for both X+ and X- movements.
Sets the maximum angular amplitude of the camera shake applied to the camera’s orientation properties. A higher value results in greater camera shaking.
Sets the frequency of camera shake (number of fluctuations per second). Larger values result in faster shake movement.
Auto Add Settings
Sets whether to apply various functions when a camera is automatically generated. Note: This does not apply to cameras created via the “Create Camera Layer” button.
Surface Layer Tab

Surface Layer Settings
Sets the color of the surface layer using RGB values.
Sets the opacity of the surface layer.
Once / Loop Tab
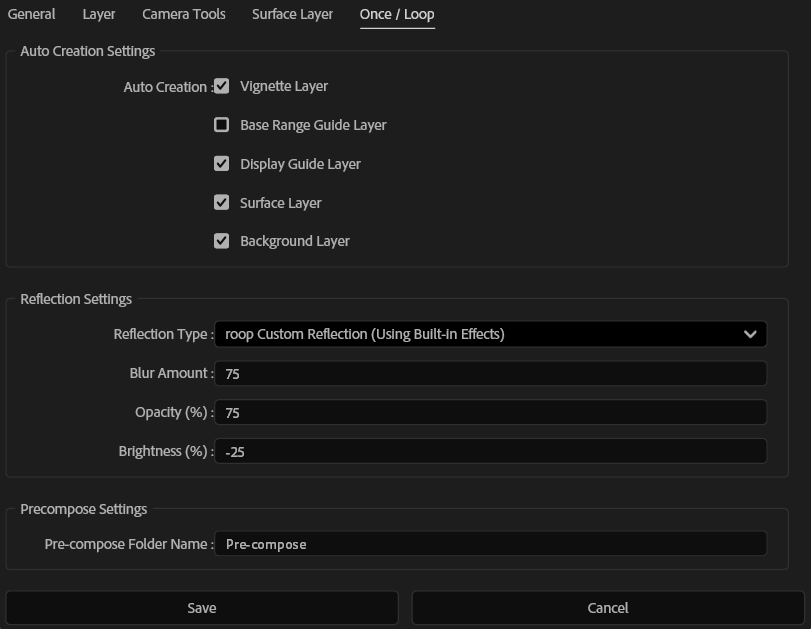
Auto Creation Settings
Automatically creates various layers when executing Once or Loop functions.
Reflection Settings
Select the Reflection Type. To disable reflections, select ‘None’. To enable, select ‘roop Custom Reflection (Using Built-in Effects)’.
Sets the Blur Amount for the reflection. Setting this to 0 will result in a sharp reflection without any blur.
Sets the opacity of the reflection. This can be specified in the range of 0 to 100.
Sets the brightness of the reflection. Can be specified from -100 to 0, and is used to darken the reflection.
Precompose Settings
Sets the name of the folder in the Project Panel that stores the pre-compose compositions generated when running the Once or Loop functions. This folder is created at the same hierarchical level as the active composition.
[IMPORTANT] About After Effects Constraints
For hints and tips on how to address After Effects limitations, please see below:
Continuous 3D Space Detection
In the Timeline panel, if a 2D layer is placed between 3D layers (including Camera and Light layers), they are not processed as a single continuous 3D space. This is a native After Effects specification. Therefore, when roop functions detect this case during execution, they automatically adjust the layer order to ensure a continuous 3D space.
In addition to the automatic movement mentioned above, Virtual 3D surface layers are also automatically adjusted to be positioned below the 3D layer group to ensure the correct stacking order is maintained.
Issues with 3D Layer Render Order
In After Effects, if 3D layers intersect even slightly, the rendering order may be reversed based on their distance from the camera, regardless of their actual stack order.
Please ensure that layers do not intersect in 3D space when rotating them.
roop mitigates this by using pseudo-3D for the surface layers (Floor, Ceiling, Left Wall, and Right Wall) to prevent such intersections.
However, in very rare cases, enabling the LookAtCamera feature may cause layers to rotate and intersect with each other.
If you encounter issues with the layer order, please try the following:
- Disable ‘LookAtCamera’: You can find this setting on the Control_Roop layer.
- If you have rotated a 3D layer, adjust it to ensure it does not intersect with other layers.
Rendering Errors Due to Overload
When using motion blur with a large number of 3D layers and fast camera movements, high processing loads may lead to temporary expression errors or rendering failures (such as visual glitches in specific frames).
In such cases, the following steps may reduce the load and ensure a successful render:
- Switch the Expression Engine to ‘JavaScript’: (File > Project Settings > Expressions)
- Lower the ‘Samples per Frame’ and ‘Maximum Adaptive Samples’: (Composition Settings > Advanced)
- Reduce the number of 3D layers.
- Avoid fast camera movements or rotations.
- Disable Motion Blur.